How to start a kick-ass blog for free, with nginx, Cloudflare and Linux
Well, this domain name costs me ~10$ per year. The rest of technologies and services I will talk about are really free.
Prerequisite knowledge/inventory: An old/retired/unused computer with internet connection with any Linux distribution installed on it.
What you will learn: How to set up nginx for your website or blog, with SSL security included. How to set up and configure Cloudflare for your website or blog. How to set up Reverse Proxy with Cloudflare Zero Trust Tunnel service. And finally, some quick tips on how to get started on blogging, such as: Search Engine Optimization (SEO) and organizing your website's code.
In short, I use an old laptop with Archlinux installed on it. It runs an nginx (read 'engine x') web server. The laptop broadcasts to the internet via Cloudflare Zero Tunnel, which provides free reverse proxy, among some other crucial security features. For the blog itself, I use nothing but plain HTML files. No SSR rendering, no wordpress, no front-end frameworks or any other bloatware. I never been happier. Do you want to view this page with better user interface? Just turn on reader view from your browser. Thanks modern HTML.
If you know what above terms mean, then you probably already know how this all works. Still you might find this post enjoyable to read. If you don't understand what any of the terms above mean, then do not be afraid. I will explain them as plainly as possible. Also even I don't know how some of the stuff works! So in some cases I will only give surface level explanation that won't melt your brain (and mine).
For an actually short version of this long blog post, see this other post of mine, where I only go over the steps with no deep explanation (approximately 10 minutes to read).
Click here to skip to the How-To part.
The Why
Before we talk about how-to part of this post, let's take a step back and talk about why not wordpress, why no substack? Why not a medium account? Hell I could make a notion account and get all these blogging features for free. It even supports AI so I don't even have to blog myself! Well this post is for people who want to blog themselves. It is for those people who yearn the old web and who wants to be a part of a time that is long past. It is for those people who know the feeling of putting their hand on an old crusty laptop, feeling the vibrations of this trustworthy machine which is serving the world the words they have written. Straight out of their closet. My server is in my bedroom.

This above image may be alluring for some people. If you are one of them, this blog post is for you. The fact that you can hold your server in your hand. Try to do that for your Azure web services? I can already hear you say "try to run a machine learning pipeline that serves millions of people in a fraction of a second, using the server in your hand?". Well there is nothing special about doing that after you send buckets of money to Mr Microsoft. But we will talk about running distributed machine learning pipelines over WebRTC, where each participant can join a network with a machine that they (can) hold in their hands. Completely for free (so long you don't charge them). But thats for another topic. (Go check out GunDB, which is where I learnt that idea from!)
So why build your blog from scratch instead of getting any other free services? Not even Wordpress? Which is open source? There may be many answers to this question. For me it is simple: Because I can. In 2024, this undertaking has become surprisingly simple. Alongside this, so many free/paid alternatives have also made their way into the market. Do you see a connection there?
At the end this is a question you must answer yourself. Do you want to be sole owner of your files or are you okay to hand over your work to someone else's computer? Are you okay that this someone is a corporation whose sole aim is to make profit, where you are nothing but a number to them? You can say, who cares? They give me so many nice features for free. If you think that way, it may be the case that you don't know that 99% of these cool features are already free. User Interface is an illusion. It is the selling point of many such companies. They just build a cool user interface over existing technologies, and pretend they solve something. Perhaps they do. They solve away the intriguing curiosity that drives people to learn new things and improve themselves. They make people go "Oh, look at that new shiny thing company X is giving us, now I can just use that instead of learning Y".
Take for example the features of notion:
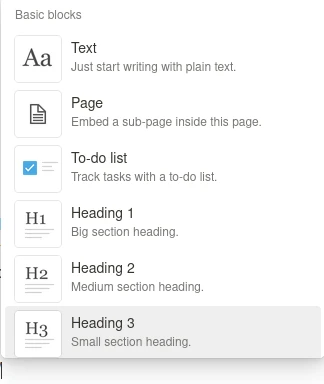
What you see above is a nice set of formatted text options. If you think this is an awesome feature that notion invented, you should learn HTML now. After that, all that facade will melt away and the beauty of simplicity will reveal itself to you. Hell I am writing this post in pure HTML now. I can add italic text, I can add bold text, you name it. Audio, images, videos, gifs, table, they are all native HTML features in 2024 (some of those have always been).
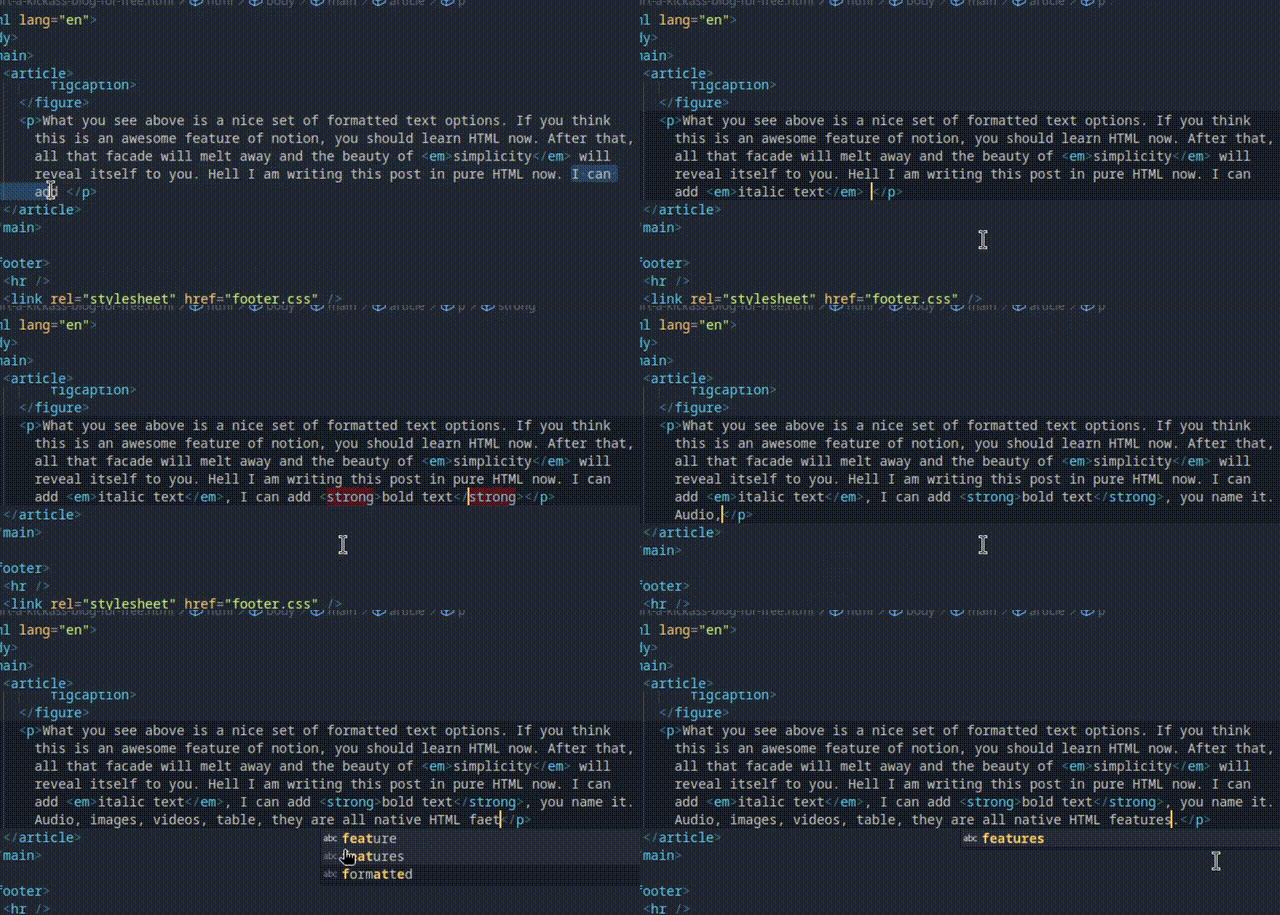
I made a quick gif above so you can see what it looks like. Notice how
instead of typing the full <em> or
<strong> tags, I just type a few letters and hit
enter, and the code editor takes care of the rest. For me, this
reduces notion and all websites alike to bloatware.
But you can collaborate with notion... Yes I know. You can
collaborate in many ways. Unfortunately we are letting these other
websites define how we collaborate.
But notion also connects to all my favorite apps.... You mean
all the other bloatware that you think you need? I will talk about
these topics, but first I want to be able to finish this blog post. So
let's jump right in to the how-to part.
The How-To Part
The steps we will follow for the rest of the post is as follows:
- Create a folder where all the content of your website/blog will reside in
- Install nginx
- Configure Cloudflare to manage your domain name
- Start blogging!
- Addendum A: Basic Search Engine Optimization (SEO) steps for discoverability on Google (and other search engines)
- Addendum B: How to organize and write your blog on your actively used personal computer and push the files to your server computer, and why
- Addendum C: How to Blog
- FAQ: Writing a blog post on this huge topic is a difficult undertaking. I hope to keep this post as short as possible. This FAQ section should provide you with some extra information for some topics on which I will only skim through throughout the post.
I tried to write the above list in some sort of a logical/easiness order of doing things. However you can follow in any order you want. Your blog will be up and running under the domain name you bought once all the steps are complete. The addendum steps are not required to have your blog up and running per se, but nice to have.
Create a folder where your blog's files will reside in
Done already? No? Just create an empty folder and name it something.
You can name it anything you want, but I suggest that you give it the
same name your domain name is, to keep things simple. My folder is
named ideasofhakki.com. While you are at it, just create
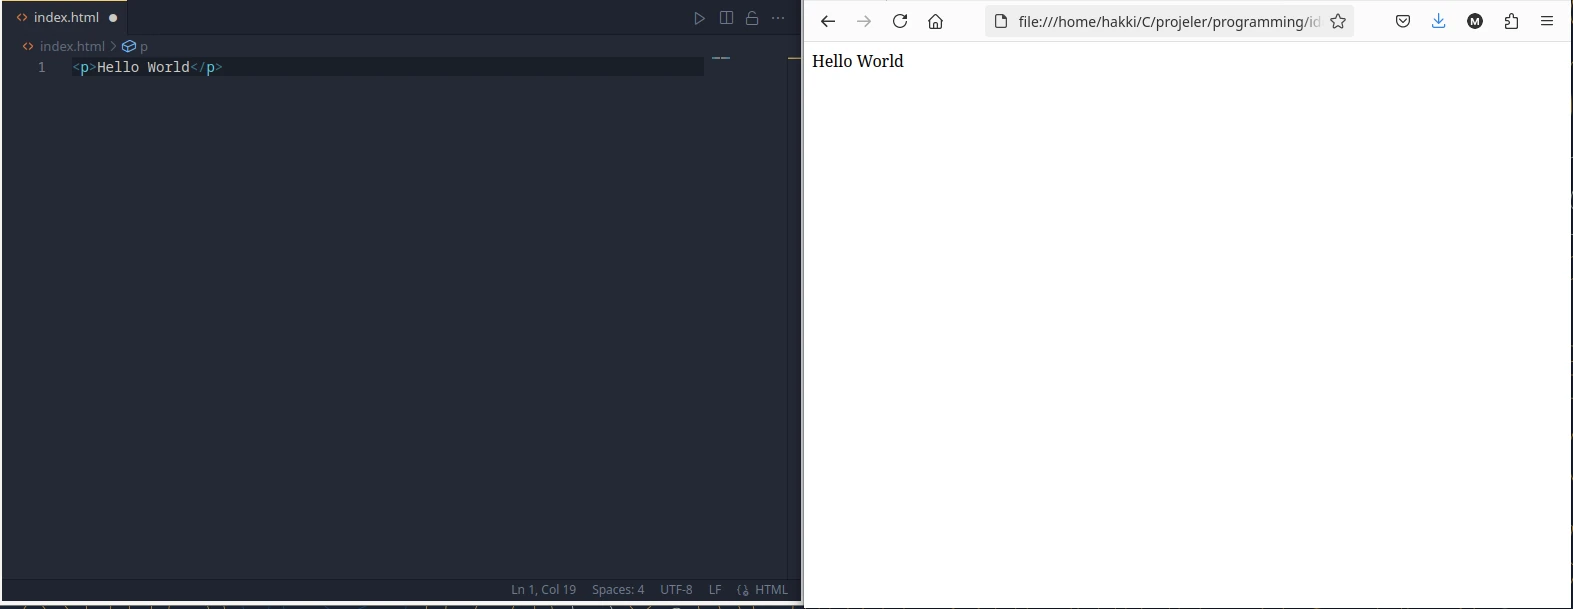
a file named index.html in the folder. You can create a
<p> tag and write 'Hello World' in it. At this
point actually, you can open this file in your favorite browser and
already view how it will look like. This is the flesh of your
website/blog.
Install nginx
What is nginx [g] [g] and why we need it? Shortly: It is what makes your server a server. To explain this further, first let's see what happens when somebody tries to visit our website. At this point we have a folder with the files of our amazing blog, right? Our good old crusty computer will serve those folder's contents to the internet. Let's call this computer our server from now on. The server will serve the website, if and only if somebody opens their browser, and types your website's domain name in the URL address box. Well, maybe they will find your blog from a search engine. But when the user clicks on that search result, the search engine will automatically write your website's domain name in the URL address box. At this point, the browser will request your website's files from the server. Now comes the point where nginx is useful. In order for your server to find the relevant files on the hard drive and serve them to the requested user, it needs a so called HTTP server. Nginx does exactly that, and a lot more. But we only need its HTTP server functionalities. This is a very simple set up. Let's start by making sure that it is installed on our Linux distribution.
Find how to install nginx on your distribution. Here I list commands for some popular distributions:
Install nginx on ArchLinux:
sudo pacman -Syu
sudo pacman -S nginx
Install nginx on Ubuntu/Debian:
sudo apt update
sudo apt install nginx -y
Importantly we also need to 'activate' or 'start' nginx. This activation needs to be done every time you boot your computer. Pretty much like any program you would open and use. Since this is your server, hopefully you won't be shutting it down ever or not even restarting it. However if you do, you don't want to forget to activate nginx every time. So we can also 'enable' it such that it activates/starts automatically when the computer starts. Run the following commands:
sudo systemctl start nginx
sudo systemctl enable nginx
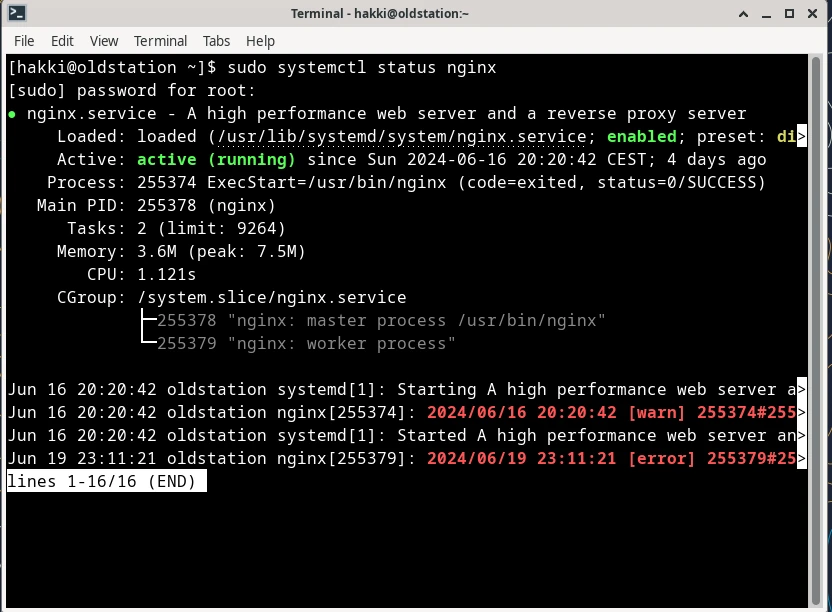
You should now check the status of nginx. Run:
sudo systemctl status nginxYou should see something similar to below image. Notice the green 'active (running)' text. If you see this, then you successfully completed the first part of this step.
Create and configure an nginx server block
Now that we installed nginx, we will tell it where to find the folder which holds our blog's files and to which domain name to serve it to. This is accomplished with a so called server block. It is basically a file that we must create inside nginx's configuration folder. Then we will type some words in it. Nothing scary, nothing complicated. We will simply write in this file what is our domain name and the path to our website's files. That's all. You can do all sorts of sorcery with nginx. But accomplishing what we want is fairly simple. So let's do it.
Here is a million dollar visualization of what we need to achieve in this step. We want to establish the following connection:
Files of your
Website <-> nginx <-> Your domain
name <-> The Internet
In most Linux distributions, nginx configuration folder is in
/etc/nginx/ path. This folder will be protected from any
manipulation (so called write permissions) by the normal user. So you
need to run the commands as a sudo, like when we installed nginx. The
reason I explain this is because, since I told above that all we need
to do is create a file and write some stuff in it, you might be
inclined to do it via your file browser's comfortable GUI. You can
still go to the /etc/nginx/ folder via your file browser
and observe the changes there as you go. However I suggest that we run
commands in the terminal. When you will be writing things in the file,
you also need sudo permission. The most straightforward way to write
files while you are inside the terminal is vi or vim editor (they are
two different editors, your distro probably already has the former
installed). However if you never used it, you will have
troubles
exiting
it. If you already have a favorite
editor installed on your distro, such as mousepad or visual studio
code, you should be able to open these editors with
sudo command preceding them. Do what you are comfortable
with. I will use mousepad in below examples.
Let's observe below how a typical /etc/nginx/ folder
looks like:
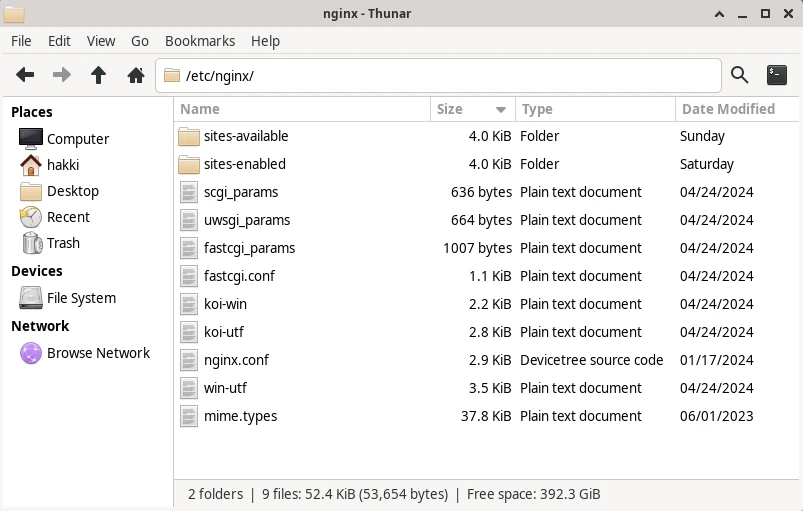
If you don't already see the folders sites-available and sites-enabled, then also create
them. We will put individual configuration files of our websites inside the sites-available folder.
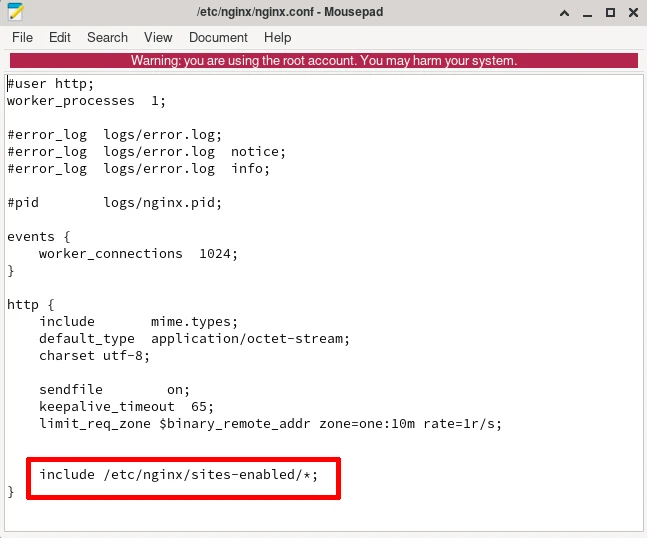
After you create the sites-available folder, go ahead and open the /etc/nginx/nginx.conf
file. This is the main configuration file of Nginx. In this file, we need to tell Nginx that we are placing individual
site configurations in sites-enabled. Why are we putting the configuration files inside
sites-available but telling Nginx to look at sites-enabled folder? Well if the folder names
are not self-explanatory by themselves, just keep on reading after the image below.
To tell Nginx where our blog's configuration file is, type:
include /etc/nginx/sites-enabled/*; inside the http block of the main Nginx configuration file, which should be at
/etc/nginx/nginx.conf.
Now we will create our server block file (the configuration file) in the sites-available
folder. After we are done, we will 'link' that file into the
sites-enabled folder. Thanks to this process, nginx allows you to
create server block files in sites-available folder without the fear
of breaking something. When we are ready, we link that file into
sites-enabled folder, which will then be, well, enabled.
Now let's create the file with our sudo command. I will use 'mousepad' editor:
sudo mousepad /etc/nginx/sites-available/ideasofhakki.com In the above example I am naming my server block file 'ideasofhakki.com'. Like other things, you can name this file whatever you want. What matters is its contents. When you run the command with sudo priviliges, you should see the red warning line in your mousepad editor. This indicates that you indeed opened the editor with sudo priviliges.
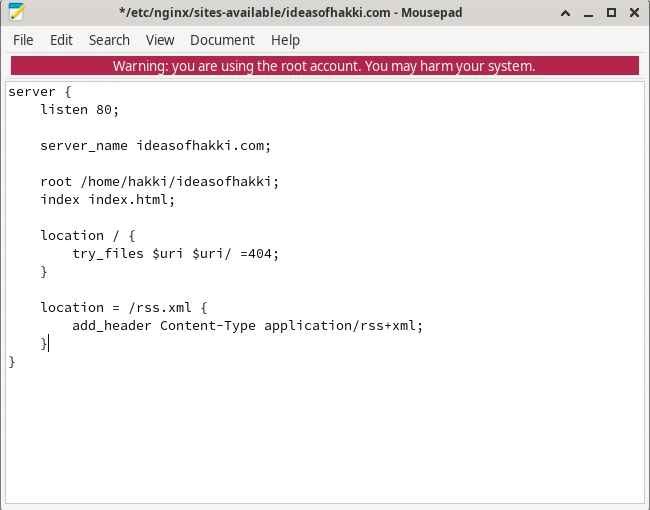
Try to read the contents of the file above and understand yourself. Below is an explanation of the most important parts. I highlighted the parts that are a 'block', i.e. they belong together.
listen 80; -> Port 80 is the default network port for
web servers using HTTP.
server_name ideasofhakki.com; -> This line tells nginx
the domain name for this server.
root /home/hakki/ideasofhakki; -> This line tells
nginx the location of our website's contents.
index index.html; -> This line tells nginx the main
entry point of your website. See next example too.
location / {
-> This block describes the entry point of our website.
This is the first page that your users are expected to see when they
first visit your website. By convention we name this file
try_files $uri $uri/ /index.html =404;
}index.html. We created this file in the first step.
Basically nginx interprets this as such: When users visit the
root address of the website (hence the 'location /' expression), serve them the
index.html file.
location = /rss.xml {
-> This block describes the location of the RSS file. RSS is a
special file that allows users to 'subscribe' to the new posts of your
website. You thought you needed a fancy commercial blog
engine/platform/mailing list service to get your readers subscribed to
you? No you don't need that. Thanks to the RSS file, your users can
get updates when you make a new post. When you write a new post, you
also add a simple entry to the RSS file with the name and the URL of
your post. Your users simply need to connect your website to their
favorite RSS reader. This RSS reader will find your RSS file thanks to
this block. This is it! This way you also can't spam your users. We
haven't yet created an RSS file. I will show you how to do that in
Addendum A.
add_header Content-Type application/rss+xml;
}
This is basically it for the server block file. Find below the full content so you can copy paste and edit it for your needs. You only need to add your own domain name and path to your website's folder. I highlighted the relevant parts that you need to change.
server {
listen 80;
server_name ideasofhakki.com;
location = /favicon.ico { access_log off; log_not_found off; }
root /home/hakki/ideasofhakki;
index index.html;
location / {

        try_files $uri $uri/ /index.html =404;

        }
location = /rss.xml {

          add_header Content-Type application/rss+xml;

        }
}
Good. Now make sure to save your file. Make sure that this file is in
'/etc/nginx/sites-available' folder. Now we need to link
this file to '/etc/nginx/sites-enabled' folder. Run the
following command:
ln -s /etc/nginx/sites-available/ideasofhakki.com /etc/nginx/sites-enabled/I highlighted the name of my server block file. Don't copy the code blindly.
Make sure to write the absolute paths to avoid any mistakes. For
example, in the terminal, you might already be inside the
/etc/nginx/sites-available folder. In this case you might
be inclined to run the following wrong command:
ln -s ideasofhakki.com ../sites-enabled/
This so called 'linking' is actually called a symlink, or
a 'symbolic link'. For a detailed explanation, see
this stackoverflow answer.
So far we created a server block file and we created a symlink in the
/etc/nginx/sites-enabled folder. Now we need to restart
nginx. Before we do that, it is a good practice to ask nginx if
everything is OK. If not, and if you try to restart anyways, it will
throw an error and it will shut down. This means your
server will be shut down. Under such state, all your websites that are
served from this computer will be inaccessible to the users. So run
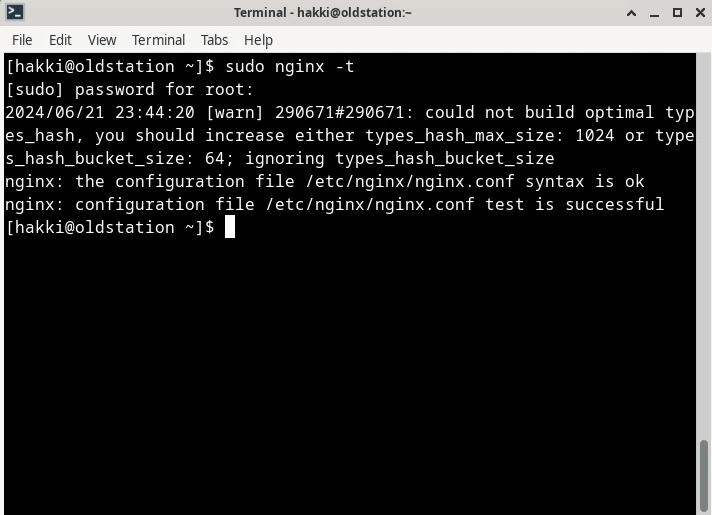
the following command to see if everything is OK:
sudo nginx -tYou should see the following. Notice the final two lines that says 'syntax is ok' and 'test is successful'. I also get some warnings from my other files. They are OK. If you see something else other than 'syntax is ok' and 'test is successful', then revise the above steps.
Now restart nginx:
sudo systemctl restart nginx
Make sure to check the status of nginx via
systemctl command again:
sudo systemctl status nginxIf you made this far, you can already call yourself a sysadmin. Or not . First you need to experience the pain of destroying your servers. If you do your research well and follow best practices, you will reduce your chances of experiencing it. Your chances will never be 0.
In the next steps, we will be connecting our domain name to Cloudflare, implementing security measures with Cloudflare and finally connect our server to the Cloudflare's Zero Trust Tunnel. While we implement the security measures, we will modify our server block from nginx further as well. We are not quite done with configuring nginx. But if you did the above steps, you should already be more comfortable. A quick note here: Cloudflare calls our server the origin server. I will occasionally use that from now on as well.
Configure Cloudflare to manage your domain name
Thanks to Cloudflare, all the traffic between your server and the users will be secure and encrypted. Cloudflare will sit between your server computer and the users (or the attackers) who visit your website. Cloudflare takes away a huge complexity thanks to this.
In this step we will simply add our domain name to Cloudflare. I will not go into much details here. The information in this step can change in the future when Cloudflare user interface changes. This is why it is best if you refer to Cloudflare's own documentation. Here is a link to their documentation for adding a site (June 2024).
Just open a free account with Cloudflare. Then you should see somewhere an "add site" button. There you should see a page similar to this:
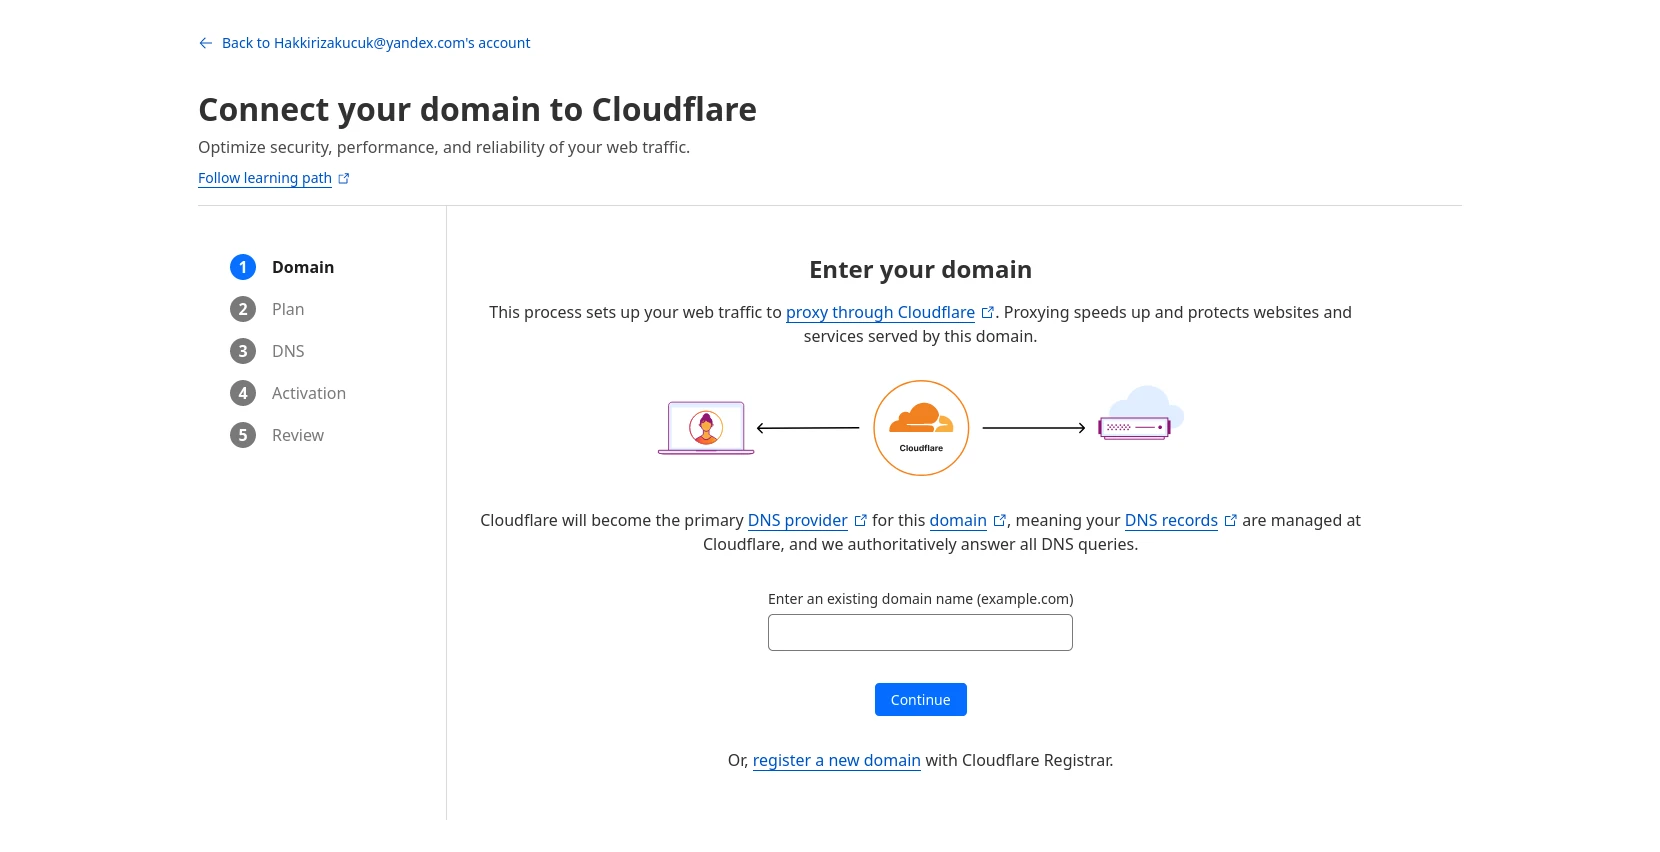
Follow the steps there. As you see above, you can enter an existing domain name or you can buy a new domain name from Cloudflare. Once it is complete, you should be able to see your domain name's overview page.
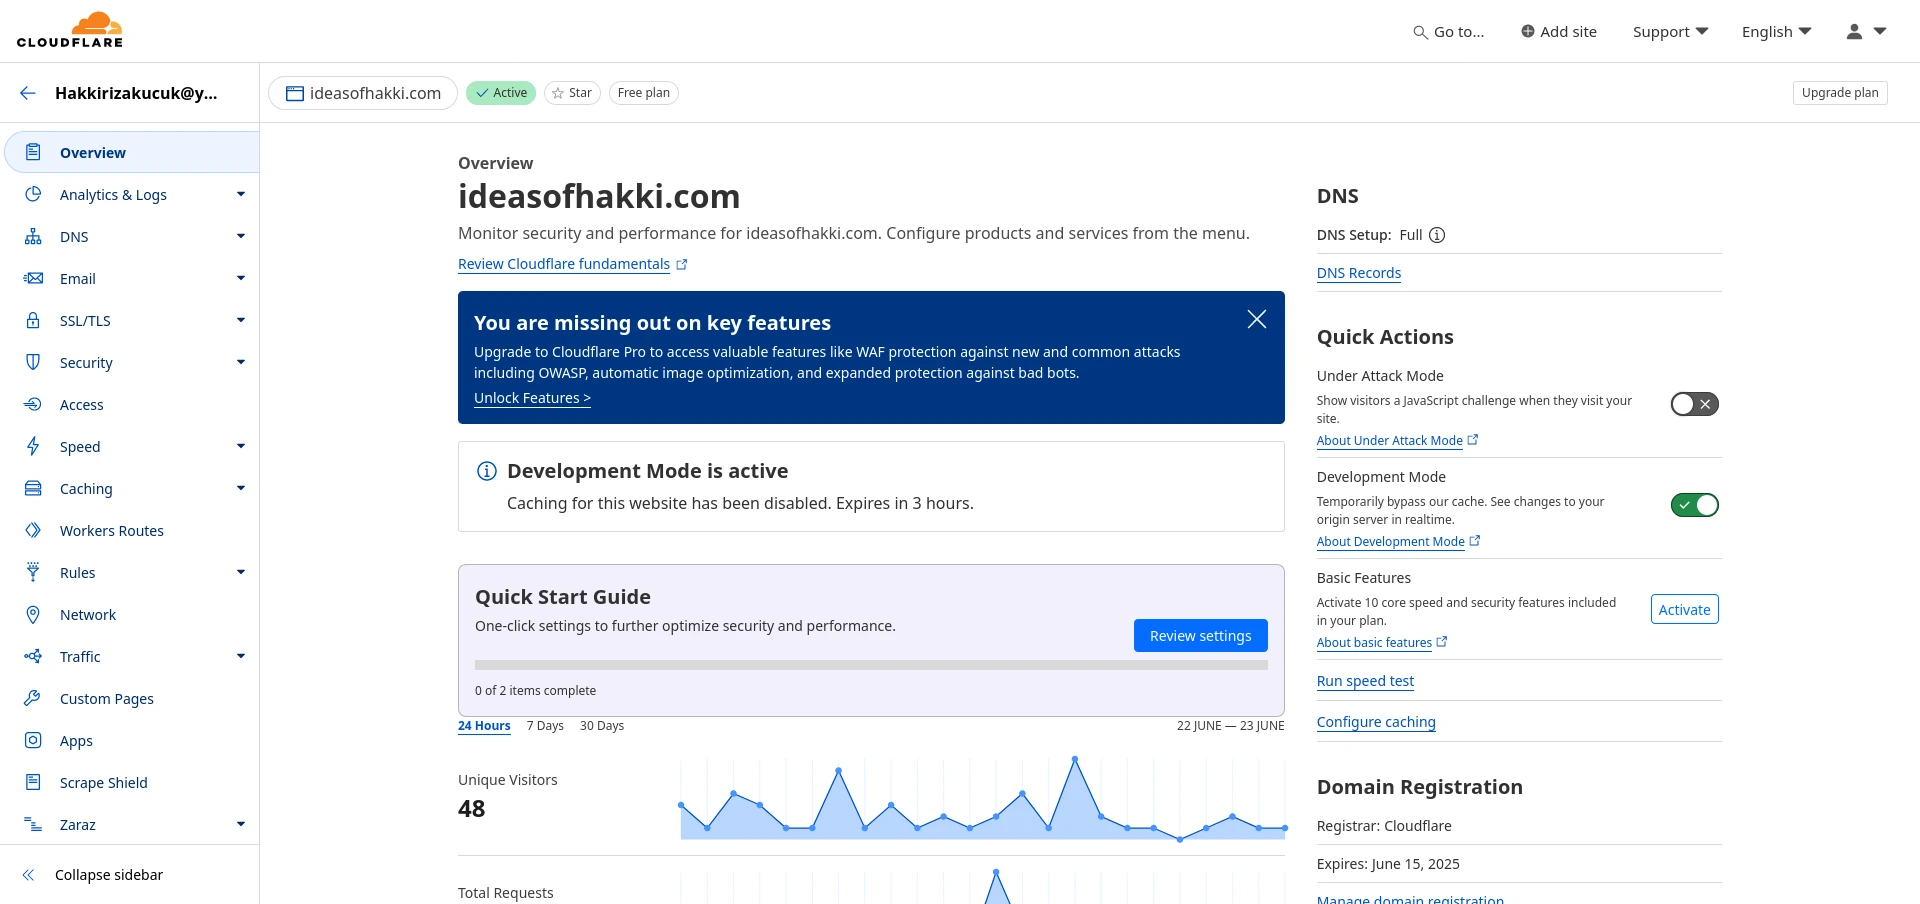
At this point we have two settings to play with. First is that we want to make sure all traffic is encrypted. Second is that we want to make sure that when users go to your website via HTTP, they get automatically redirected to HTTPS (the HTTP Secure). Once we finish with these settings, we must also place SSL certificates in our server, or the origin server, as Cloudflare calls it.
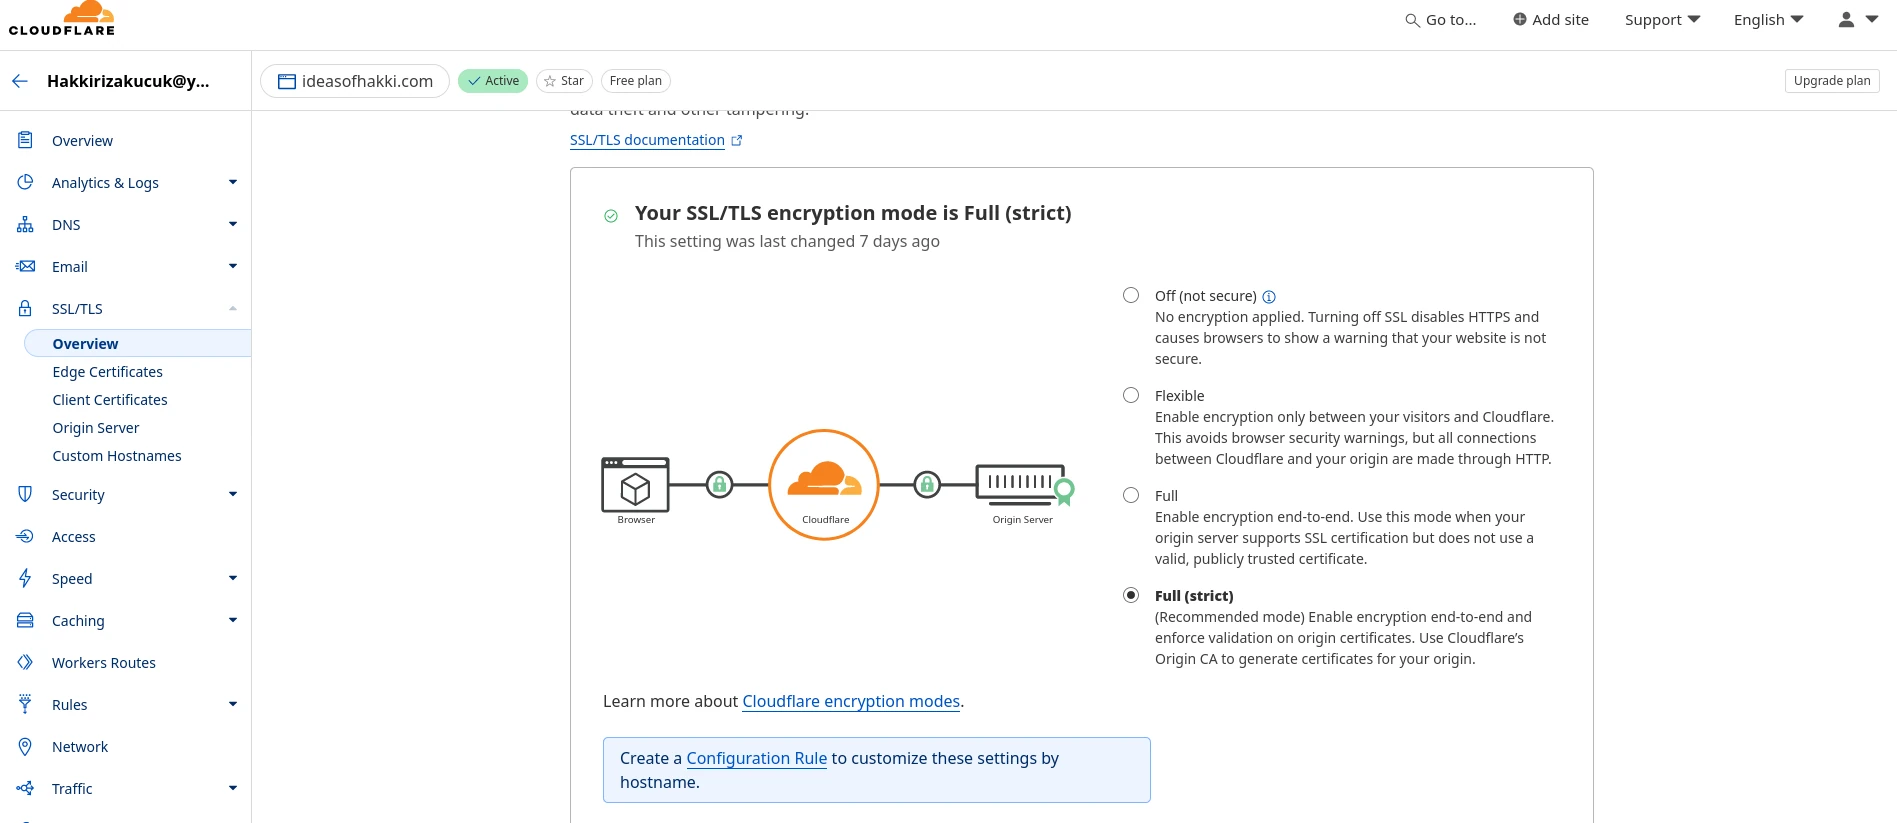
For the first setting, on the left panel, go to 'SSL/TLS'>'Overview' option. There you should see 4 options. Choose 'Full (strict)'. Below is a screenshot of how it should look like. Keep in mind that without SSL Certificate measures in place, you will not have a secure setup, regardless of whether you chose 'Full (strict)' option. So make sure to follow the next steps with extreme prejudice.
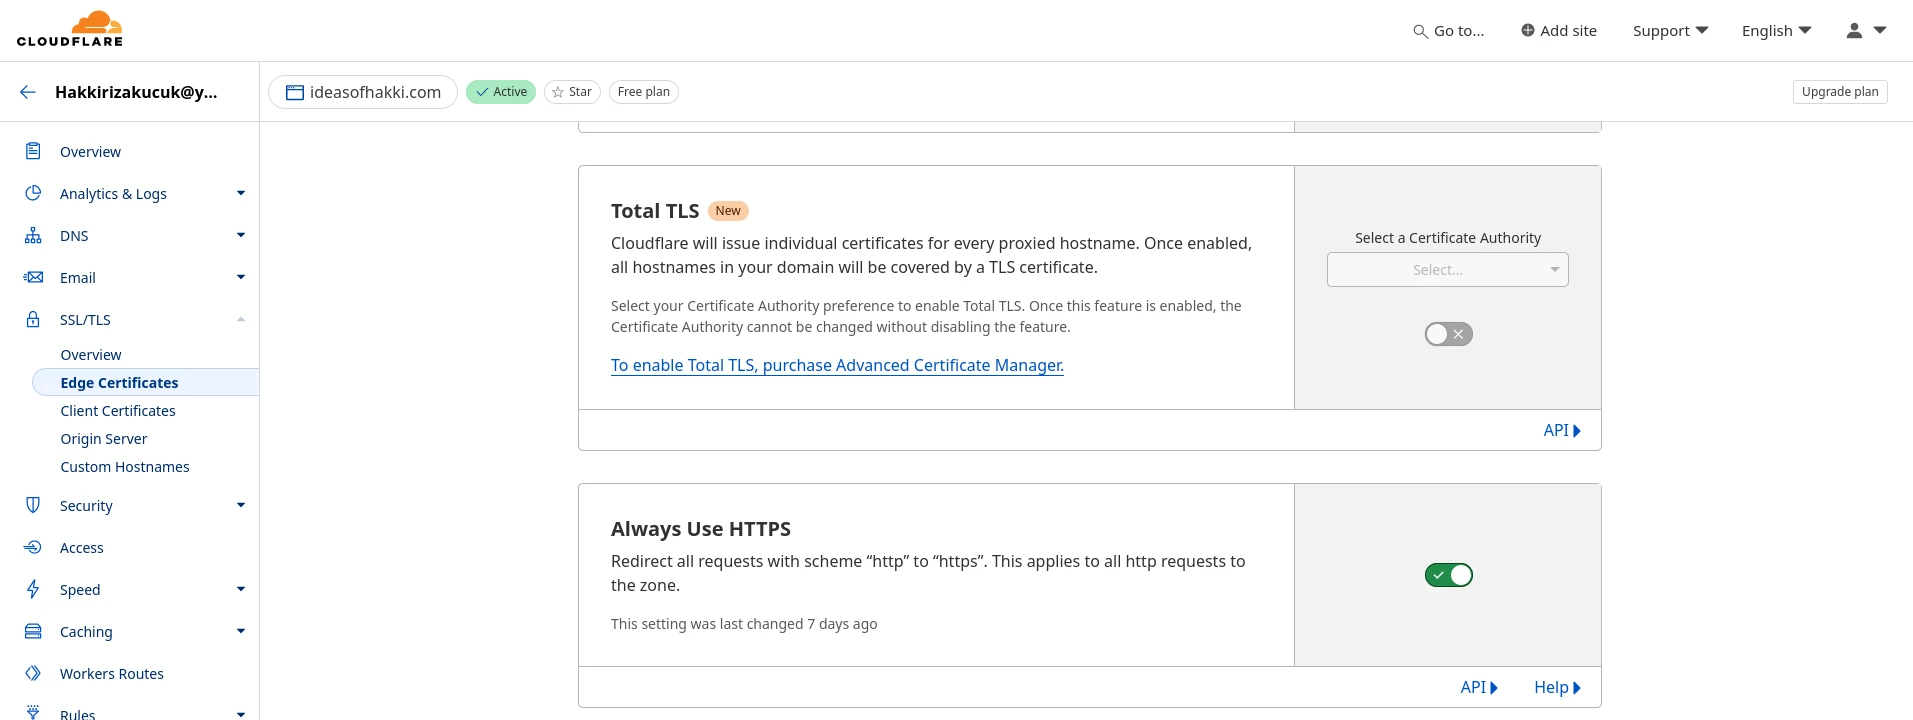
For the second option, under the same 'SSL/TLS' tab, you should see 'Edge Certificates' option. Go there, scroll a bit down. You should see 'Always Use HTTPS' option. Turn in on. Done. Below is a screenshot:
Good! We are done with setting up our site specific settings for Cloudflare. Now we must obtain SSL Certificates from Cloudflare and place them in our server/origin server.
Remember to take a break.
Download and Install Cloudflare Origin (SSL) Certificates to your Server
In this step we will obtain and place so called SSL Certificates on our server. These certificates will allow our server and our users to communicate securely. Without this step, your server and especially the connection between your server and your users will be susceptible to a large array of nasty attacks.
An explanation on security: With the above setup, your users can be sure that they can securely access your website. As SSL/TLS overview page in Cloudflare suggests, Cloudflare sits between you and your users. The traffic between Cloudflare and your users will be secure, so they will see a secure 'lock' icon on their browsers when they visit your website. However the traffic between your server and the Cloudflare will not be encyrpted or secure. In order to achieve full security between your server and Cloudflare, we will obtain and place SSL Certificates in our server. The cruciality of this step requires me to write this paragraph. So let's get started.
Navigate to 'SSL/TLS'>'Origin Server' page. You should see a page similar to below screenshot. As you can see I already have a Certificate generated. Go ahead and click 'Create Certificate' to obtain yours.

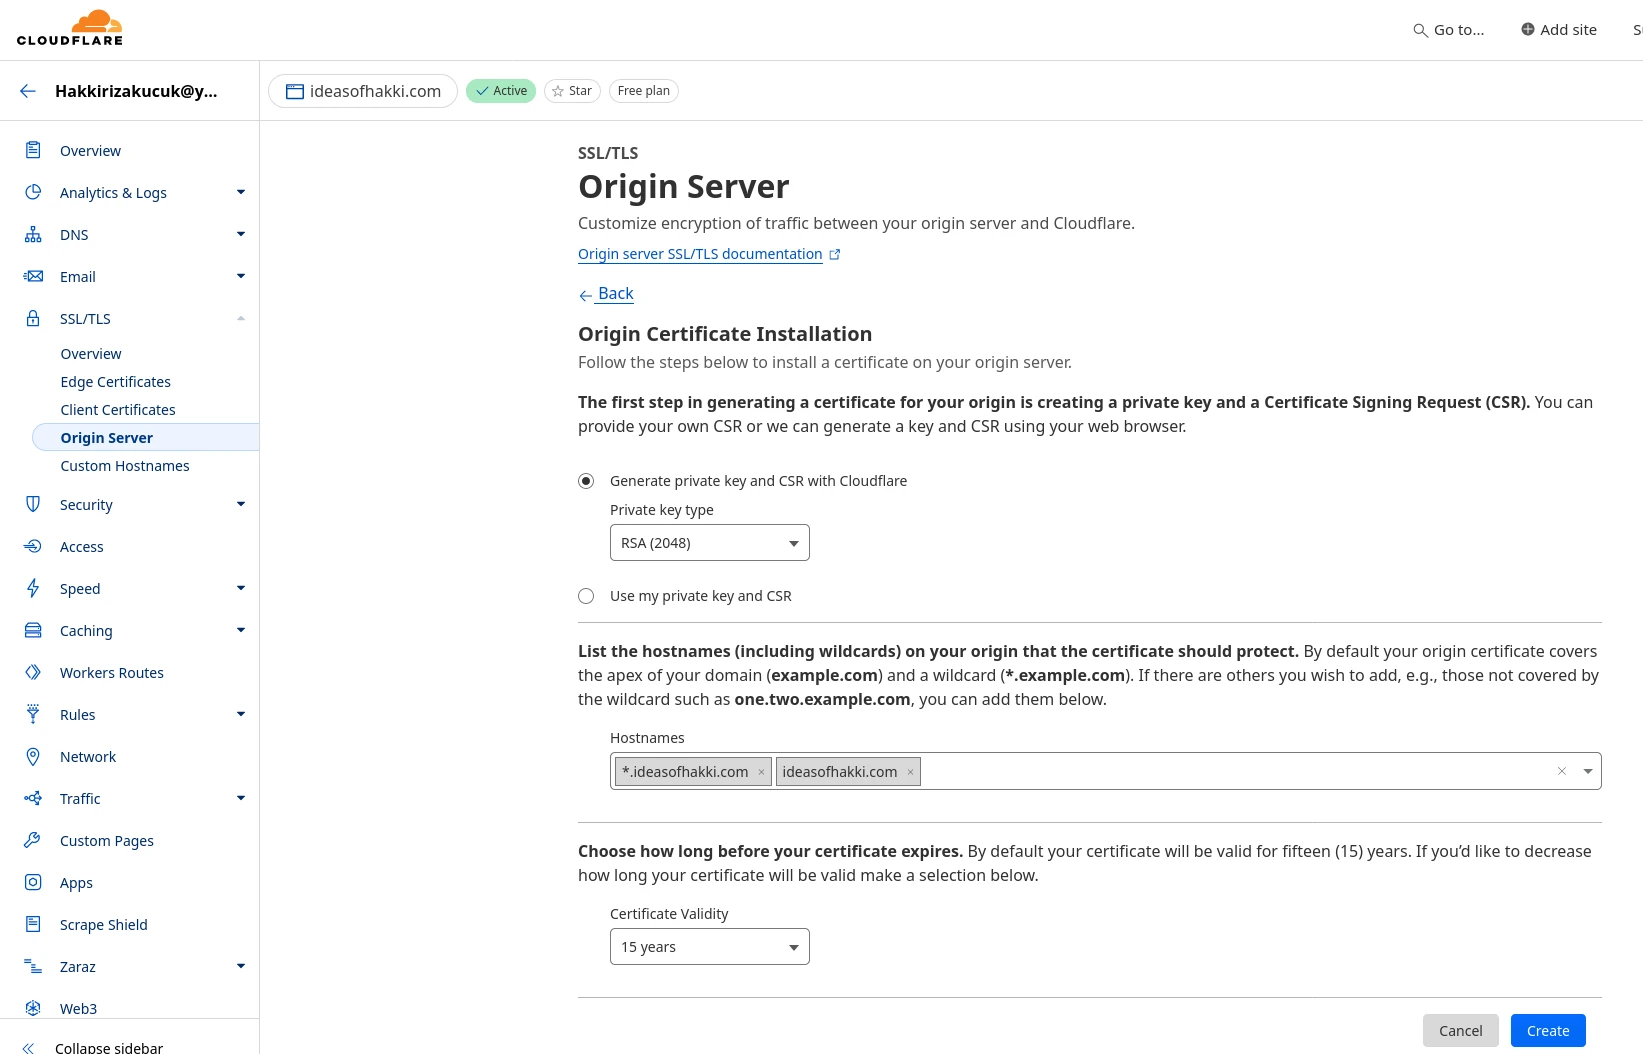
You should now see a page similar to below screenshot. These are the default options and I haven't changed them. Now hit 'Create'. In the next page, Cloudflare will present you with 'Origin Certificate' and 'Private Key'. This will be the ONLY TIME that you see the Private Key. So copy it. If you miss your opportunity, simply create another one (and I suggest that you revoke the one you did not use). As you can understand, the Private Key is very important that it does not fall into the hands of malicious players. Treat that file with utmost care.
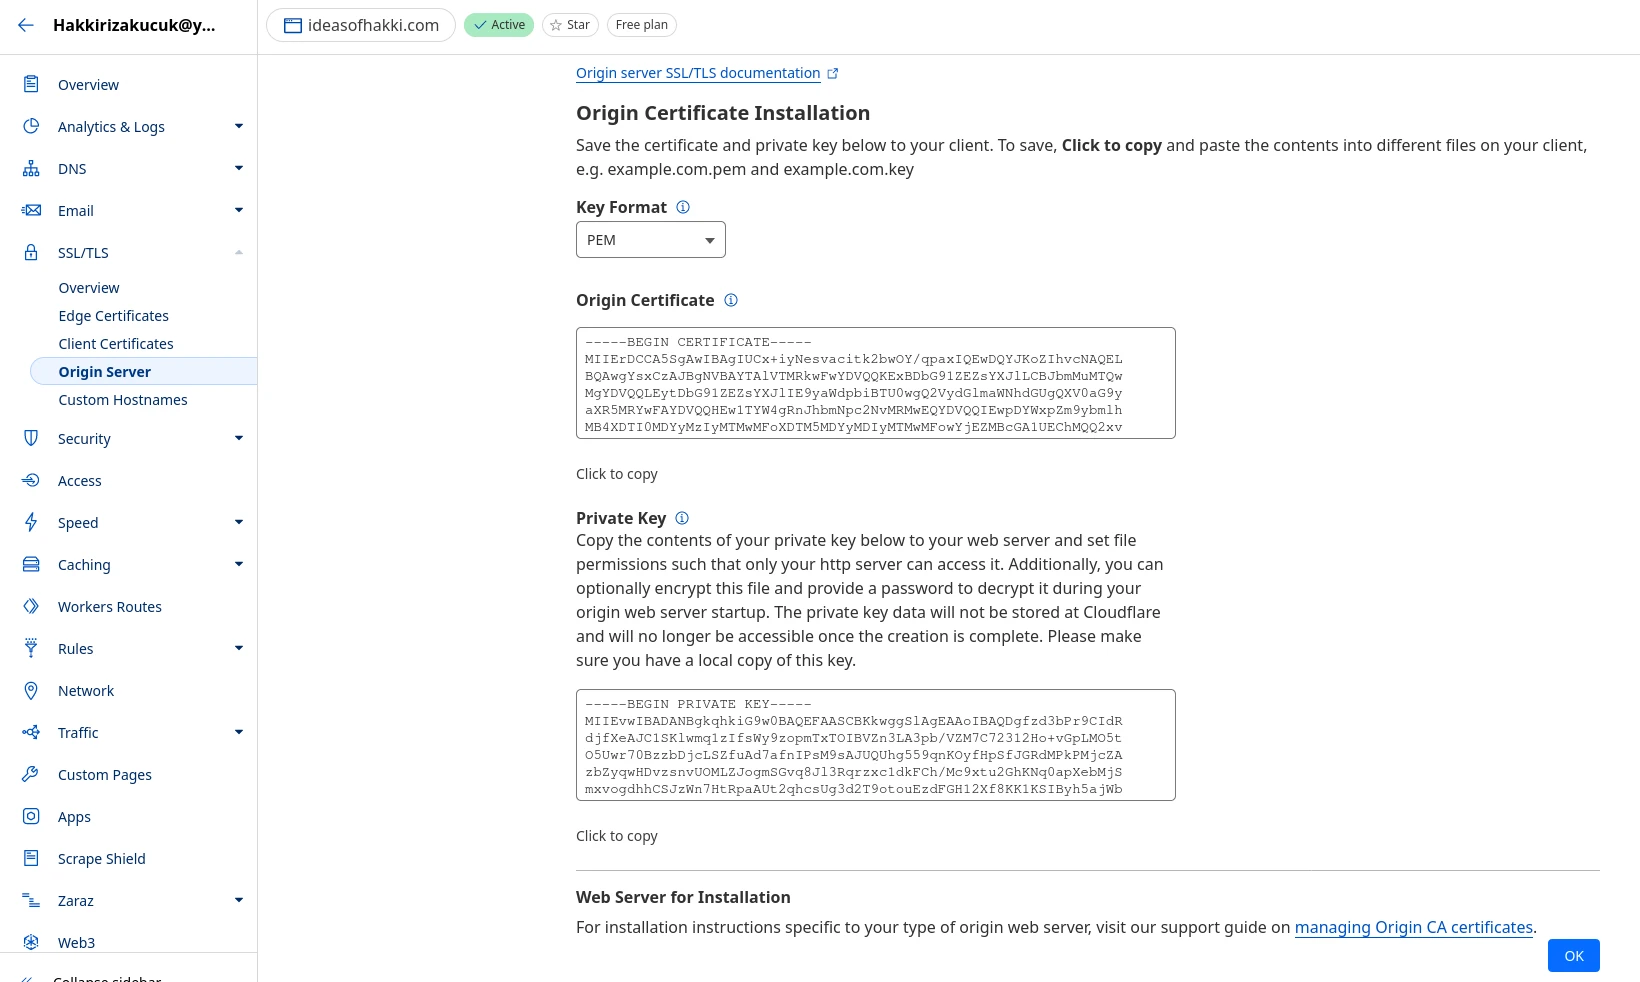
Below is a screenshot of my newly generated Origin Certificate and Private Key. Make sure that you copy both nicely. If you so wish, you will be able to see the Origin Certificate again, however Private Key will not be shown to you again. So copy it now and save somewhere. In the next steps, we will move these files in appropriate places in our server. Make sure that copies of the Private Key don't stay somewhere willy nilly.
So just to be clear with what we are doing, let me repeat again. We are copying this Certificate and Private
Key text that Cloudflare gave to us. We are then pasting the two text in a new file each. You can name the files
anything you want, but by convention you should name them yourdomainname.com.crt and
yourdomainname.com.key respectively for the Certificate and the Private Key. And
remember: You should make sure that these two files only include the text that
we copied. Not even a white empty line should be added before or after this text in the file you create.
Now in your origin server, you should already have a folder called
/etc/ssl/. This is where your Certificate and Private Key
will go to. There you should also see /etc/ssl/certs/ and
/etc/ssl/private/ folders. Place your Certificate and
Private Key files in /etc/ssl/certs/ and
/etc/ssl/private/ respectively. To move those files
there, you will need sudo priviliges. Call
sudo Your_Favorite_File_Browser to open a sudo priviliged
file browser, like we did earlier with mousepad. I like
Thunar.
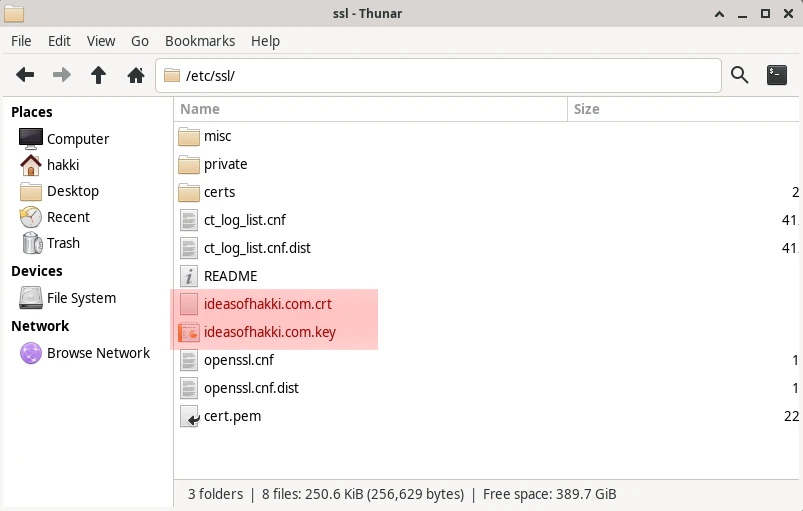
As you can see red highlighted area, I have named my Certificate and
Private Key as 'domainname.crt/key' and placed them directly in
/etc/ssl folder. You can name them whatever you want.
After finishing this blog post, I will also be tidy and place them
inside certs and private folders
respectively. We will later specify the path of these files in our
nginx server block, such that nginx can use these files to encrypt the
site traffic before serving them. Since we tell the path of these
files to nginx, it is not strictly required to place those files in
their respective folders, other than to keep things tidy. This is the
beauty of Linux (and computers). Nothing is implicit. Everything is
explicitly defined or referred to somewhere. The rest is your taste of
doing things.
Before we move on, remember to set the owner and permission rules for these files. For more information on this, search Google for Linux file permissions/ownership. Simply, run the following commands:
sudo chown root:root /etc/ssl/private/your_private_key.key
sudo chmod 600 /etc/ssl/private/your_private_key.key
As usual, I am highlighting the parts that you need to change for your case. The above code sets the ownership and permissions for your Private Key. Now do the same for your Certificate:
sudo chown root:root /etc/ssl/certs/your_certificate.crt
sudo chmod 644 /etc/ssl/certs/your_certificate.crt
Good. Now let's update nginx server block to actually use the Certificate and the Private Key. Well, I don't want to bore you more than necessary, so I will just paste my updated server block in its entirety and give short explanations. I highlighted the new lines. Also make sure to write correct paths for your Certificate and Private Key.
server {
listen 80;
listen 443 ssl;
  server_name ideasofhakki.com;

  ssl_certificate     /etc/ssl/ideasofhakki.com.crt;
  ssl_certificate_key /etc/ssl/ideasofhakki.com.key;

  ssl_protocols SSLv3 TLSv1.3;
  ssl_prefer_server_ciphers on;
  ssl_ciphers HIGH:!aNULL:!MD5;

  root /home/hakki/ideasofhakki;
  index index.html;

  location / {
    try_files $uri $uri/ =404;
  }

  location = /rss.xml {
    add_header Content-Type application/rss+xml;
  }
}
In short, listen 443 ssl Refers to the HTTPS protocol.
The port 443 is the HTTPS port, like port 80 was for HTTP. Our nginx
server block now wants to listen for secure HTTP connections as well.
Can we have a secure connection without our beloved Certificate and
Private Key? Of course not! So next addition is the
ssl_certificate and
ssl_certificate_key lines, which point to the files we
obtain from Cloudflare, respectively. At this point we are done.
However internet suggested me the next three lines as well. They are
apparently making things a little more secure, by covering certain
edge cases. There are supposed to be even more such configuration
options that you may want to use. I personally don't know much about
such stuff, but I am supposed to give you a through overview of things
since I set up myself up to write this blog post. Since this is the
part where we make our website secure, it is justified that I at least
mention some of them:
-
HSTS (HTTP Strict Transport Security):
Ensures that browsers always connect to your site over HTTPS. DO NOT do this, because if you remember, we already turned that option on inside Cloudflare, so it is handled for us. But ever curious how Cloudflare handles it in the background? Well here you go:
add_header Strict-Transport-Security "max-age=31536000; includeSubDomains" always;If you want, add this line in your nginx config and then remember to disable it in our Cloudflare settings.
-
OCSP Stapling:
Improves SSL handshake speed by including the OCSP response in the handshake.
ssl_stapling on; ssl_stapling_verify on; resolver 8.8.8.8 8.8.4.4 valid=300s; resolver_timeout 5s; -
SSL Session Caching:
Improves performance by enabling SSL session caching.
ssl_session_cache shared:SSL:10m;
ssl_session_timeout 10m;
This is all from me for the security measures. Make sure to do your research on this topic. Extra security (most of the time) does not hurt.
Remember to check your nginx file syntax validity by:
sudo nginx -tIf everything is OK, then restart the nginx service and check its status as well:
sudo systemctl restart nginx
sudo systemctl status nginx
You are getting a hang of it, eh? We have now successfully configured nginx to use Secure HTTP protocol. We have also configured Cloudflare to provide us with end-to-end encryption, all the way from user's browser to our origin server. If you made this far, I actually suggest that you give a yourself a tap on the shoulder (not yet celebrate). You have configured nginx server files, dammit. Server configuration is a whole world on its own. You can go down the rabbit hole pretty deep, you can be an expert on this topic and get a full-time job. They will ask you to do nothing but maintain their servers run by nginx or Apache and so on. You are about knee deep in this swamp land.
We shall now move to the reverse proxy step, where Cloudflare will also come to rescue us. And then, believe it or not, but your website will be up and running! Completely secure, blazingly fast, and breathtakingly beautiful. This is a motherfuckingblog (in reference to: motherfuckingwebsite.com ).
Remember to take a break.
Configure Cloudflare Zero Trust Tunnel for Reverse Proxy
Cloudflare started a new service called 'Zero Trust Tunnel' as of 2021, according to the Internet Archive. This service allows us to create a 'reverse proxy' for our server computer. If you don't understand what this means, you might be confused about why we need this. After all we set up nginx which connects the files on your computer to the domain name. And we even connected our domain name to Cloudflare so that Cloudflare would manage it. So should not now everything just work? Why do we need an extra tunnel between the server and the Cloudflare? I will provide below an FAQ section to answer to some of these questions. Below is an overview.
You see, we did set up nginx, which serves the website's files when a request for the specified domain name arrives (for me, ideasofhakki.com). However, there is a missing link in this puzzle: How does the request arrive at your server? The request can only arrive in your server computer, if it can find it in the jungle of interconnected computers across the globe (i.e. internet). For that, your computer needs to have an address, like your house address so you can receive letters. For certain reasons, there is not a straightforward way to give your server computer an address. It is, very simply put, quite difficult to obtain one. A so called reverse proxy attempts to solve this problem by doing the following: A big company does obtain an address first. Then you allow that company to inject your computer with specific identifier. This way, whenever needed, that company can find your computer (as long as you have very simple internet connection). Then, when a user visits 'ideasofhakki.com', we let that request to first arrive at that company's computers. Remember that the company has the power to actually obtain an address. So the request can find that company's computers. And since the company knows how to find your computer, it can conveniently forward that request to you. From that point on, nginx in your computer takes over and serves the files back. The files first arrive at the company's computers, which are then forwarded back to the user. In our case, this company is Cloudflare. Remember the overview image from Cloudflare's 'SSL/TLS' page? In this step, we will simply install a software from Cloudflare on our server. Thanks to this software, a tunnel will be established between our server and the Cloudflare.
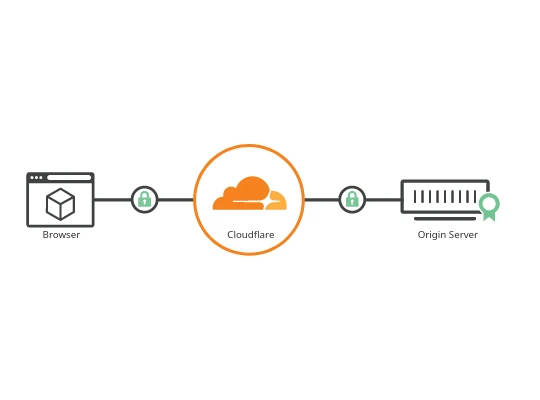
Remember the overview image from Cloudflare's 'SSL/TLS' page? Try to understand that so far we did not tell Cloudflare anything about our origin server. The above image conceptualizes that Cloudflare sits between users' browser and our server. However it might mistakenly lead you to think that Cloudflare is already connected to our server. It is not. It stills needs a little help so that it can actually talk to our server. Once this is done, the traffic will actually start flowing.
So this step fairly simple. Let's see an overview first: In your Linux
distribution, install a software called cloudflared. Here
are
installation
instructions
for various operating systems from official Cloudflare docs. Then we
will launch
Zero Trust service from Cloudflare. There we will create a new
Tunnel. When the tunnel is created,
Cloudflare will give us a convenient command line code that is
generated specifically for our tunnel. When we run that code, the
tunnel will be established. Finally we will create a rule for our
domain name in that tunnel. Let's get started.
When you launch the Zero Trust service, navigate to
Networks > Tunnels. Then you should the screenshot
below.
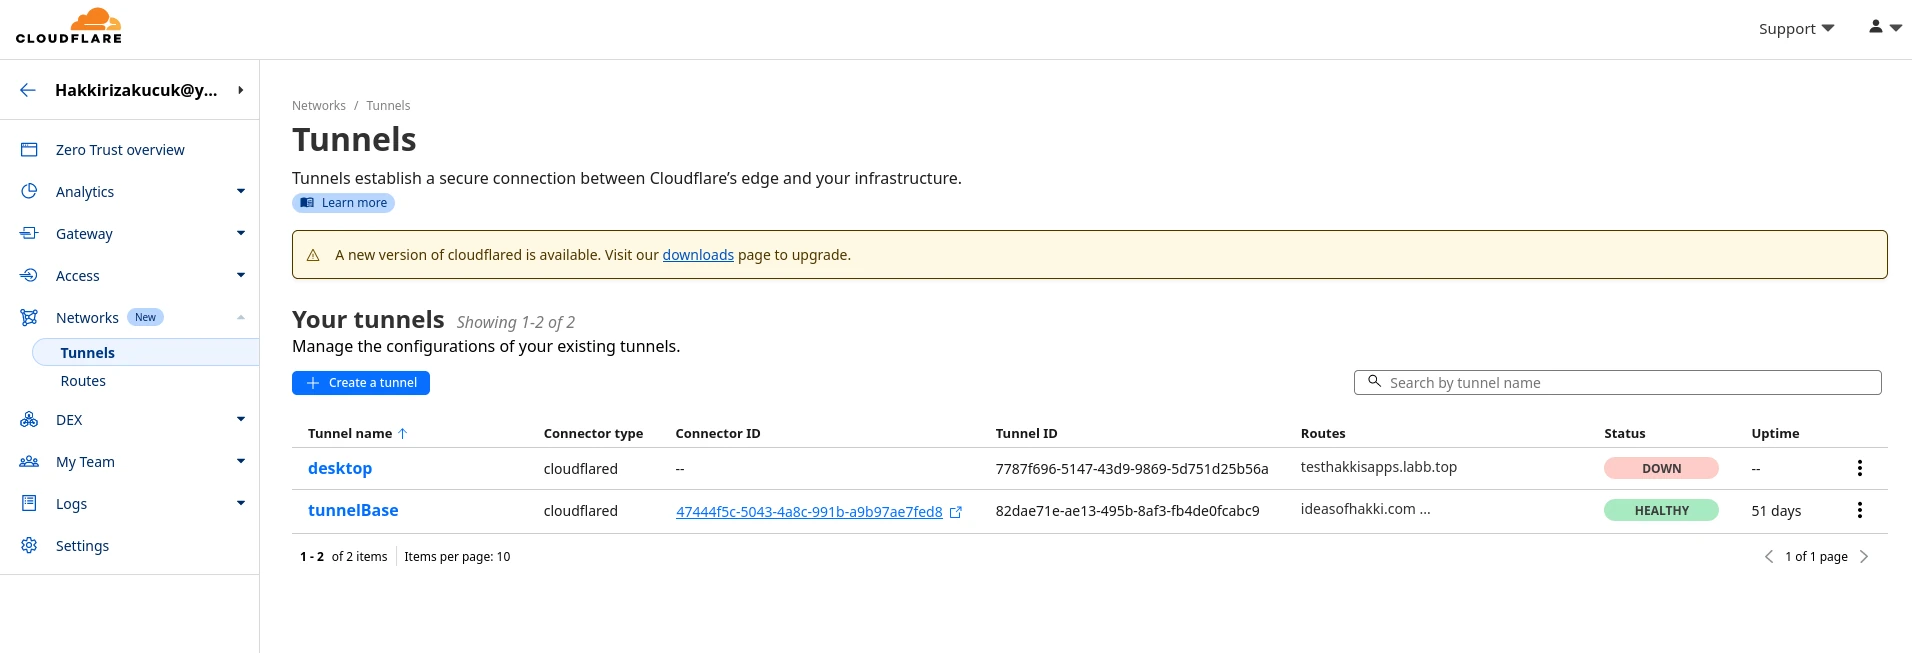
You can already see that I have two tunnels, one named
desktop and one named tunnelBase. The latter
is the tunnel from my server laptop. Notice that it is 'Healthy',
meaning that the tunnel is up and running. Hit 'Create a tunnel'
button to create yours. You will directed to some steps. You will be
asked to select a connector. Choose recommended 'Cloudflared'
connector. Then give your tunnel a name. Finally you will be given a
piece of command line code which you can run to establish your tunnel.
It should look something like this:
sudo cloudflared service install eyJhIjoiMT.... # (redacted)
Run this command after you make sure that
cloudflared command line program is installed.
Installation instructions link above. If everything went fine, your
tunnel should now be established. You can verify this by the following
command:
sudo systemctl status cloudflared
If not enabled already, I suggest that you enable this
cloudflared service so that it will automatically turn
itself on in case you reboot your server. Like similar to nginx.
Enable it with:
sudo systemctl enable cloudflared
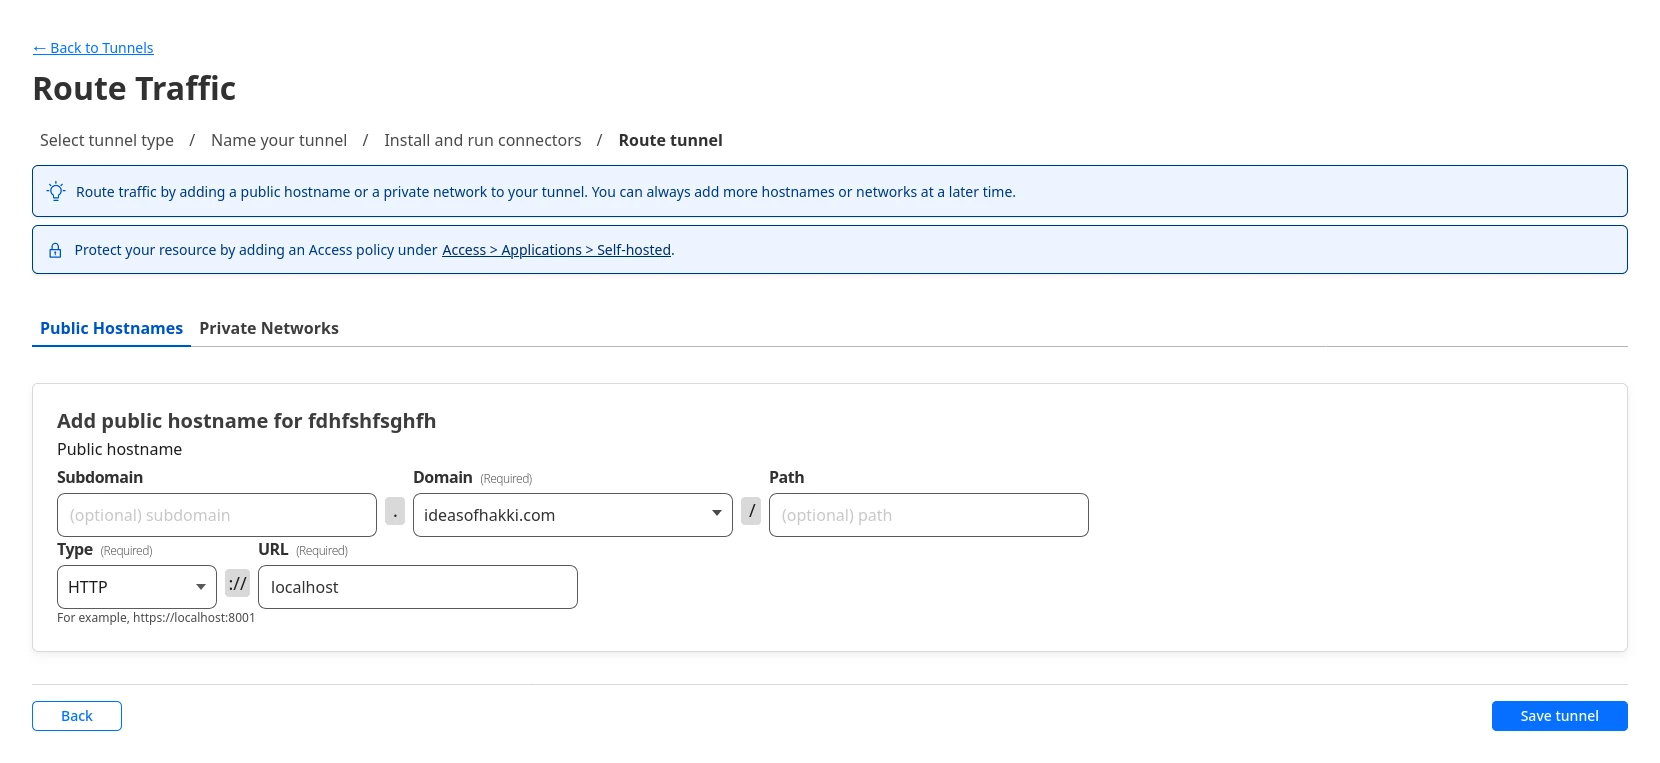
Next page should say 'Route Traffic'. Screenshot below. The 'Domain'
field is a dropdown menu, from which you can choose a domain name that
you already manage with Cloudflare. Under that, you need to choose
'Type' and 'URL'. Choose HTTP and type
localhost respectively. This means that Cloudflare Tunnel
will redirect all requests for ideasofhakki.com to
http://localhost on our server computer. Guess who will
answer the call? The nginx contraption. Now the puzzle is complete,
ladies and gentlemen. Save the tunnel.
As a final step, we need to let that butterfly we captured earlier and let it flap its wings only once. The resulting wind will reach the upper atmosphere and allow a certain optical effect which should direct some cosmic rays right back at you. Make sure to place your hardware in the appropriate position so you can target that ray to change the correct bit on your hard drive. After that, your blog should be up and running!
Jokes aside, actually go ahead and visit your domain name. You should
see the 'Hello World' page. Or whatever you put in your
index.html file. Congratulations. Send your URL to your
friends and family and let them roast you. None of their criticism
will pass through your thick skin. Because now, you not only have a
website to your name, but you are part of the
self hosted community. You have set up a website
completely from ground up without relying on someone else's paid
service or freemium bloatware. There might be a doubt in your heart
about the involvement of Cloudflare. I assure you, I hold the claims I
made earlier in regards to doing things yourself versus relying on a
ready-made paid/freemium bloatware service. After the Addendums, you
can find FAQ which might hopefully answers some of your questions.
For now, let me tell you this: Due to all the screenshots from Cloudflare and the buttons and the settings we clicked through, it might overplay the involvement of Cloudflare. But remember that Cloudflare sits between the users and your server computer. It still does not in any way have any rights over your content whatsoever. And you still managed everything yourself on your end, on your server computer. This is nothing to sneeze at. If one day Cloudflare stops any one of the services it has provided us with, you have nothing to worry about. All you have to do is manage your domain name somewhere else and find another Reverse Proxy provider. Want to use a different Certificate and Private Key provider? Use Let's Encrypt. That's all Cloudflare has done for us. If you leave Cloudflare, you will still keep your computer and your files. If you want to run mission critical software & services this way, I simply suggest you to make this setup on a number of computers across different domain name managers and reverse proxy providers. Then you should really have nothing to worry about.
Now congratulations again. Do celebrate at this point if you so wish. Next up we have three things to talk about: (1) How to get discovered on Google or other search engines. Also dubbed SEO step (search engine optimization). (2) How to blog actually: How to organize your website's files and so on. Which website development tools to use? (3) Finally, you don't want to blog with your server computer. You want the server computer to sit in the closet calmly, doing its own thing. You want to blog on your personal computer, and when ready, push the files to the server computer. Let's see a clear overview:
- Addendum A: SEO
- Addendum B: How to push files to your server from another computer
- Addendum C: How to Blog
- FAQ
Addendum A: SEO
We will learn: RSS file, Site Map file, Robots.txt file, registration to Google Search Console.
RSS file allows an RSS client of your users' choice to subscribe to your website. Thanks to this, when you upload a new post and update your RSS file, that RSS client will notify your users that you have published a new post. This mechanism both allows your users to subscribe to you in a way that they wish, and it prevents you from spamming them with e-mails and other such methods. For more information, entertain yourself with this Stack Overflow answer. An RSS file looks like below:
<?xml version="1.0" encoding="UTF-8" ?>
<rss version="2.0">
<channel>
<title>Ideas of Hakki</title>
<link>https://ideasofhakki.com</link>
<description>My personal blog where I share ideas about tech, philosophy and Blender 3D</description>
<language>en-us</language>
<pubDate>Sun, 16 Jun 2024 00:00:00 +0000</pubDate>
<lastBuildDate>Sun, 16 Jun 2024 00:00:00 +0000</lastBuildDate>

<item>
    <title>How to pronounce my name, Hakki</title>
    <link>https://ideasofhakki.com/how-to-pronounce-my-name-hakki.html</link>
    <description>A short description of how to pronounce my name, Hakki</description>
    <pubDate>Sun, 16 Jun 2024 00:00:00 +0000</pubDate>
    <guid>https://ideasofhakki.com/how-to-pronounce-my-name-hakki.html</guid>
</item>

<!-- <item>
    <title>Title</title>
    <link>https://ideasofhakki.com/about</link>
    <description>short description </description>
    <pubDate>Sun, 16 Jun 2024 00:00:00 +0000</pubDate>
    <guid>https://ideasofhakki.com/about</guid>
</item> -->

<!-- Add more items here for each blog post -->
</channel>
</rss>
Notice the item tag which shows my first blog post 'How to pronounce my
name, Hakki'.
Similar to this, add each of your post to the RSS file. Place the
RSS file in the top directory of your blog's folder. This means it
should be in the same level as your index.html file.
That's is for the RSS file. When your user copies your URL (for me,
ideasofhakki.com), and paste it in their favorit RSS reader program,
that program will automatically find your RSS file.
As for the Site Map, it is an even simpler file. It is just a list of lines where each line is a URL of your website. It can also be more complicated like the above RSS file. For detailed information, please see this website. Site Map helps search engines to get a quick overview of all the accessible links in your website, so they can index it nicely. Here is my Site Map as it is right now.
https://ideasofhakki.com/
https://ideasofhakki.com/sitemap.xml
https://ideasofhakki.com/rss.xml
https://ideasofhakki.com/robots.txt
https://ideasofhakki.com/how-to-start-a-kick-ass-blog-for-free.html
https://ideasofhakki.com/how-to-pronounce-my-name-hakki.html
Notice how I included the address of my RSS file and even the Site Map itself. Put these lines in a file called sitemap.xml and also place it in the top level directory.
Now robots.txt file is also an important one. It includes
more detailed rules to tell visiting search engine bots which links
they can parse/index and which links are forbidden to them. Sometimes
you want to have pages in your website that you want human visitor to
see, but you don't want those pages to appear in the search results.
So you describe such rules here. In this post, I am explaining how to
set up a bare bones blog. So ideally we want every page to be indexed
nicely by the search engines. For more information, please see
this google document.
Below is my robotst.txt file. Also save this file in
your top level directory:
User-agent: *
Allow: /
Sitemap: https://ideasofhakki.com/sitemap.xml
This simple robots.txt file tells that
all bots are allowed to index everything. It also describes
where my Site Map is.
These practices help you get a good SEO score from search engines. It shows them that your website is accessible, clearly defined and well organized. These are the bare bones of the SEO work that you must do. Now as a final step, let's go ahead and tell Google that we are here!
Go to Google Search Console. Add your property (your website). Follow the instructions there to add your website. Google will index your website and start showing you analytics as well. But be aware, the initial indexing and analytics may take up to 24 hours to take effect. So be patient. After that, go ahead and try to search your website on Google, using some keywords or even directly the name of your website. It should show up in the search results.
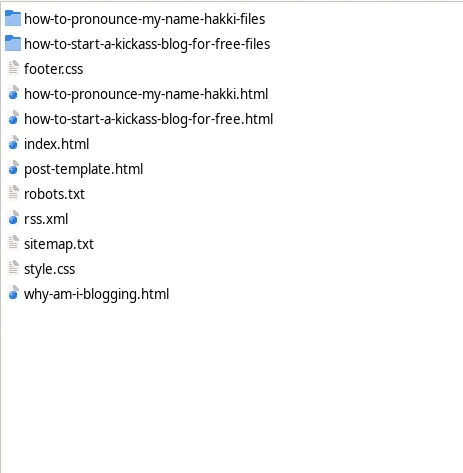
In order to clear away any doubts, I share below a screenshot of my website's folder. So you can observe how I named the files and how I placed them. The folders hold the images, audio files, videos etc. that I use in each respective blog post. That's as far as my organization goes.
This is it for the bare bones SEO! Remember to write good, semantic HTML, use accessibility features for people with disability (notice how I describe each of my images in great detail even though you can just look at them? Well some people can't. I want them to feel welcomed in my blog). Don't try to cross link your websites across one another to bump up your link score, unless they have valid reasons to be linked to one another. Search engines can understand scammy behaviour and punish you for that.
Addendum B: How to push files to your server from another computer
We will learn about: VNC, Rsync (or Grsync), SSH file transfer, FTP file transfer, other desktop management tools.
So I actually don't type my blog post on the server computer. The server computer sits alone in the bedroom somewhere, doing its own thing. I do, however, have a VNC and SSH connection set up to it. I develop my posts in my personal computer. When I am ready, I send files over yonder to the bedroom via Grsync, SSH or FTP. My favorite is Grsync, which is based Rsync. If your server and your personal computer are within the same network, you can easily transfer data between by using the IPv4 address that your router gives to your computer within the local network.
If you wish to send files to your server from a different network (i.e. server is at home but you are at Starbucks), then you need to establish an SSH or FTP connection.
I could get into more details on these specific protocols and methods, but I believe I can't provide a better explanation than what is already out there. Please search Google for how to set up such things. Hint: Since you have set up Cloudflare Zero Trust Tunnel to your server, you can also use this tunnel to set up VNC and SSH connections, which might be useful. Go search that ahead in Cloudflare docs.
But why? Well you don't really need to do that, as long as you can type in your server yourself. Usually we pick very old computers and repurpose them as servers. Sometimes they don't have a screen or a keyboard, but they still run just fine. If this is not your case, do feel free to develop on your server physically. After all, you deserve this. Because you did not pay money to Azure or AWS just to rent out a computer you can't touch or even see. However keep in mind that we don't ever want to risk where the server might shutdown. We want to keep the server physically protected. This is why it is a good idea to keep it undisturbed in some corner of your house and establish over the wire or wireless connection to it. And of course, this way you can connect to it to update things no matter where you are in the world, just like it is intended.
Addendum C: How to Blog
Now we have finally arrived at my favorite chapter. This is the
chapter where I roast all the blogging tools and ecosystems and paid
services and all the modern web development tools and
'practices'. Landing on my blog, you might have already had some ideas
about my mentality. 'Oh, this guy does not like CSS'. No, actually I
love CSS. It helps me style and color my writing, resize my images,
create spaces and margins wherever necessary. It helps me
make a cool layout for my footer, header and other stuff.
You see, my friends, I spent a lot of time thinking about how to set up this blog. I picked up React for its large ecosystem and cool features for building large dynamic website and Server Side Rendering. Then I picked up Svelte for it is a compiler that generates optimized vanilla HTML and Javascript bundles. I was confused, I did not know what I was doing. I picked up Wordpress as it gave me a nice boilerplate for a blog which provides a design that can't go wrong. When I was a kid, I built a static blog with Mithril. That was pretty cool actually. It is still available on my gitlab pages account. Check this blog post out from 2019: hrkck.gitlab.io: What is this blog about. Reading that blog post waters my eyes. What a kid. Proud of his static blog on gitlab pages and 'dreaming' about self hosting one day... Oh my god... That day has come and I haven't even realized it. This is crazy. I even had margin spaces around my posts. I was just a kid then. How funny back in 2019 apparently I was still arguing over the same issues. Trying different front end frameworks to find out the most simple options... I am happy where I am right now.

Ah... I really got emotional. You see, friend, that was a blog. This one is a blog too. This one is a motherfuckingblog. There is a moment when you code and design enough, then you reach a breaking point. Then you tell yourself, to hell with the margins and the designs. The color white includes all the other colors. What matters is what content you have. What words are you conveying to people. Does it all belong to you after all? I am not old enough so don't take my word for it. But I can assure you that people value the content more than how your website looks. And I assure you that you don't need a blog engine. You don't need a front end web framework. You don't need server side rendering (unless you really need to). All you need is a pure, beautiful HTML file. All you need it to sit down and write in it. All you need to do is to put that file in your server. You don't need to watch buildbots churning away digits to produce a static page build after all. You don't need version control, you don't need to automate anything. I have been writing this blog post for about a week now. When I am done, I will spend 5 more minutes to add a link to the main page, add a link to the RSS file, and add a link to the Site Map. All manually. I feel good. I feel like I took up farming without even taking up farming.
Now this is the point where I want to share the code for this blog.
Such that you can copy them as templates and achieve similar results.
Should I post the code down below?
Well, I don't need to. Because every single page is
already in your browser! Are you curious how this page is structured?
Just hit F12 or just right click and hit 'Inspect
Element' or 'View Page Source'. You will see my HTML pages with all
their glory. Since I don't use any weird modern web development tools,
my pages will always remain accessible to the curious. This is the
beauty of simplicity.
I hope you enjoyed this blog post. I hope I could teach you something. For now, until next time.
FAQ
So why do we need Cloudflare again?
We need Cloudflare so our server computer can speak to the internet. Cloudflare can do many things. But we essentially took advantage of its 'reverse proxy' feature.
Wait, what is 'reverse proxy' again?
A reverse proxy sits between your server and your visitors. It can be used to accomplished many things, such as load balancing, extra layer of security and so on. However we are using Cloudflare's reverse proxy for one purpose only: So our server can speak to the internet.
But why is it the case that my server can't just speak to the internet on its own? After all I am connected to the internet via Wi-Fi/Ethernet cable.
Remember that I said you need an address so you can receive requests from your visitors? The problem is that you need an IPv4 address. But you not only need an IPv4 address, but you need a fixed one. One that does not change over time. Actually, if you manage to learn your IPv4 address (if you have one), you can tell it to Cloudflare or to your domain name provider, and you will be good to go (your server will be horribly exposed to security risks). But as soon as your IPv4 address changes, your server will be in dark again. You can actually pay your IPS (internet service provider) extra money to get a stable IPv4 address.
So we can solve this problem either by getting a stable IPv4 address, or by setting up a reverse proxy. A reverse proxy basically attempts to locate your server by directly talking to it, and exposing its traffic to the rest of the internet. This way it does not matter whether your server changes it IPv4 automatically or not. Since we gave a direct access to the Cloudflare via a special identification, Cloudflare will always be able to talk to our server.
I am afraid that Cloudflare gets access to my computer this way. Didn't you defend self-hosting and freedom from large corporations?
Well, yes I did. To answer your first concern: Cloudflare can indeed send arbitrary requests to your server this way and attempt to get an answer. Your Linux system's user and file permissions would protect you to some extent. Also the traffic that you send is completely encrypted. But we encrypted it using Cloudflare's certificates? So how can we trust them. Well, you can use certificates from Let's Encrypt, but then you will be trusting them. Perhaps you should issue your own certificates. But at this point you must also declare to the world that your certificates are actually trustable. Since nobody knows who you are, your website would appear to be insecure due to the unknown certificates that you issued.
Security, trust and delegating responsibilities to other known parties is a difficult decision you must make. Cloudflare in our case is trustable, because they are well known and they have a reputation to protect. They would not be trying to steal your data willy-nilly. Otherwise they would hurt a reputation they have worked so hard to build.
Still, I believe that the solution I presented here is better than buying a server from Amazon, Microsoft or Google. In my walkthrough, I essentially present self-hosted principles. You are the sole owner of your bare metal and you are the sole owner of the data.
I understand everything, except one thing: Why does it seem so hard to have a fixed IPv4 address?
I heard about IPv6 adresses, can't I have a fixed IPv6 address?
It is a little more complicated, but yes you could. Would this solve our problems and even free us from the reverse proxy set up? Actually you don't want such a stable address, unless you know what you are doing.
In order to answer this question, we must talk about the kind of the place that internet really is. Remember when I said that you need to have an address to receive letters in real life? In that example, we must have an address and let our address be known to everybody, such that we can get requests, right? Well in such a case, you could already easily imagine some perverts or people with bad intentions to come to your house and give you trouble. But in real world we still have police and law and what not. This would deter most of people with bad intentions to act maliciously.
In the world of internet, there is absolutely no law. Not only there is no law, there is almost no perfect way to protect yourself from attacks and hacks. If you would put a server out there in the internet with a fixed IPv4 address, and not even tell anybody about it, it would still get hacked at some point. Automatic hacking bots who scan the entire web casually and attempt known exploits would eventually get you. It is like wild west out there. This is why we don't actually want to have a publicly known IP address. This is why we want reverse proxy.
Are you affiliated with Cloudflare?
No, Cloudflare won't even notice that I am writing this blog post. They are pretty big already. I use them in this post because their service is actually good. If they mess things up in the future, I would not hesitate to switch to other reverse proxy providers.
I have other questions but I can't see them here. How can I ask you directly?
Please try to reach me to through the links I provide below each of my posts. I can be reached via e-mail or linkedin. These would be the fastest options. Find my e-mail in my CV.
Footnotes
- (If you do all the steps in this post and something is still not running, my first suggestion would be to check your firewall settings. For most distributions, everything should work out of the box. I can't go into details on this topics as they are outside the scope of this post.) ↩
-
Normally a simple file should have the extension of
.txt—However this is not a strict requirement. A sitemap with XML extension is supposed to have the structure of an XML file. We will get into the details of better Site Maps in a different blog posts. The reason why I am showing it as an XML file is because when Google indexes my page, it reads this sitemap - txt file, and then sends me an error: No page found as sitemap-txt ... Why is this happening? Because Google cannot understand whether I am pointing to a genuine URL in my blog or whether I am simply giving an example! ↩